NextAuth with Google Provider

Overview
Implement authentication in Next.js app using NextAuth.
We'll try the simplest build for development.
As we use Google's OAuth, we also explain how to set it up on Google Cloud Platform (GCP).
You only need to set up the application side and GCP, no database is required.
Google Cloud Platform (GCP) configuration
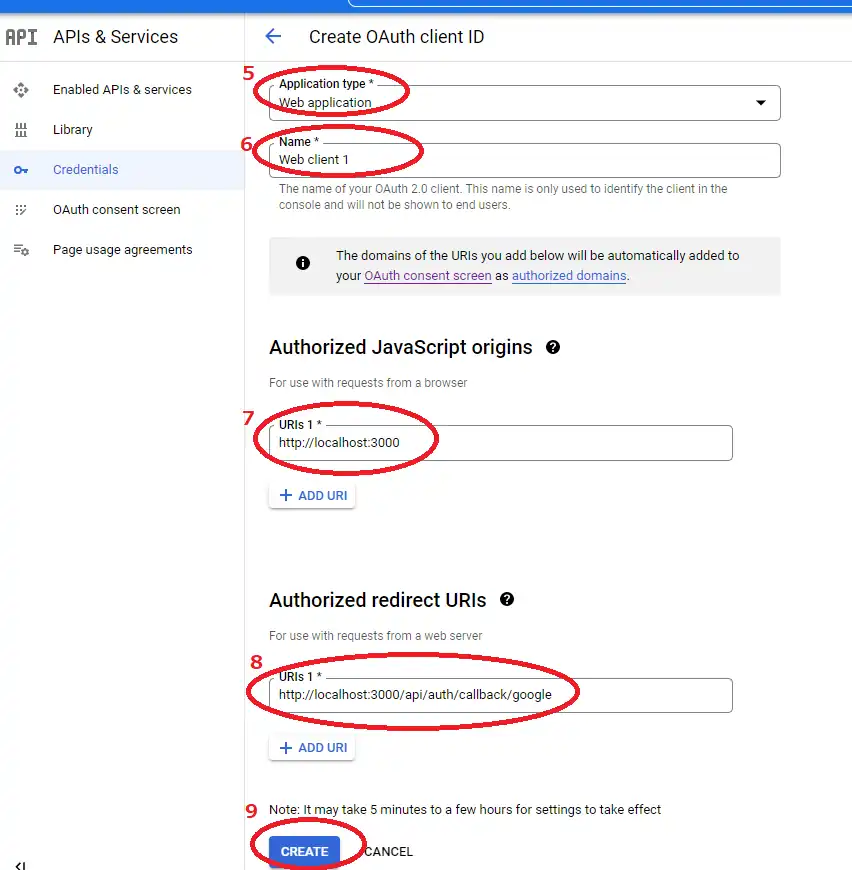
I will explain the procedure using images.

- select "APIs&Services" from the left-hand menu.
- select "Credentials" from the APIs&Services menu.
- click "+CREATE CREDENTIALS".
- select "OAuth client ID" from the drop-down menu that appears.

- set Application type to "Web application"
- name can be anything
- enter "http://localhost:3000" in Authorized JavaScript origins
- enter "http://localhost:3000/api/auth/callback/google" in Authorised redirect URIs.
- click "CREATE"
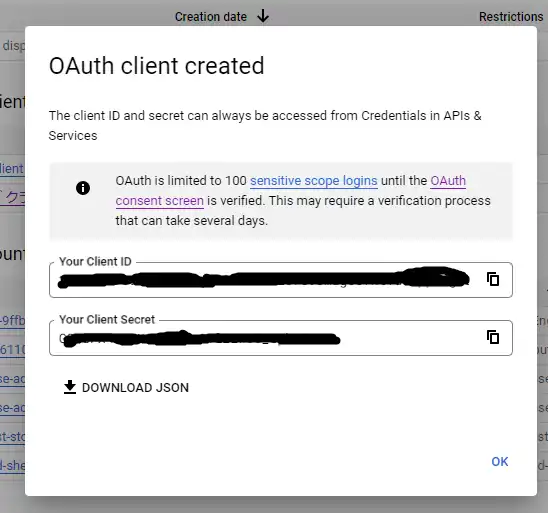
 Click on the "CREATE" button and a pop-up will apear.
"Your Client ID" and "Your Client Secret" in the pop-up will be used after this.
You can view this ID and Secret at any time from the OAuth client ID page you have created.
Next.js app configuration
The following four tasks are required.
- setting up the authentication provider
- setting up environment variables
- setting up to retrieve session state
- implementing the login/logout process
Of course, you will need to install next-auth
npm install next-authAuthentication Provider
Add the authentication provider. You can select more than one, but in this case only Google provider will be used. Create one folder and one new file.
- create a new folder named "auth" inside the "pages/api".
- create a new file named "[...nextauth].ts" inside "pages/api/auth".
The code for "[...nextauth].ts" is as follows.
import NextAuth from "next-auth";
import GoogleProvider from "next-auth/providers/google";

export default NextAuth({
  providers: [
    GoogleProvider({
      clientId: process.env.GOOGLE_ID as string,
      clientSecret: process.env.GOOGLE_SECRET as string,
    }),
  ],
  secret: process.env.NEXTAUTH_SECRET,
});
The variables in "process.env" are described next. Authentication by email is also possible using EmailProvider, but a database is required.
Environment Variables
You will create a ".env.local" file in the root level of app folder. Write the required information in this file.
- GOOGLE_ID: id set in GCP
- GOOGLE_SECRET: secret set in GCP
- NEXTAUTH_URL: "http://localhost:3000/" for development
- NEXTAUTH_SECRET: arbitrary string for development
GOOGLE_ID=YOUR_GOOGLE_ID
GOOGLE_SECRET=YOUR_GOOGLE_SECRET
NEXTAUTH_URL=http://localhost:3000/
NEXTAUTH_SECRET=YOUR_NEXTAUTH_SECRET
Session Provider
Place SessionProvider in "pages/_app.tsx". This will sync the session state. The session state can be obtained using useSession, which is described below.
import "../styles/globals.css";
import type { AppProps } from "next/app";
import { SessionProvider } from "next-auth/react";
export default function App({ Component, pageProps }: AppProps) {
  return (
    <SessionProvider session={pageProps.session}>
      <Component {...pageProps} />
    </SessionProvider>
  );
}
Login and logout
You can get the state of the session using useSession. Also, if you use "signin" and "signout" provided by NextAuth, you can use the automatically created authentication page, which is convenient.
index.tsx
import { useSession, signIn, signOut } from 'next-auth/react'

export default function Home() {
  const { data: session } = useSession()
  return (
      {session ?
        <>
          Signed in as {session.user?.email} <br />
          <button onClick={() => signOut()}>Sign out</button>
        </> :
        <>
          Not signed in <br />
          <button onClick={() => signIn()}>Sign in</button>
        </>
      }
  )
}
References
Official tutorials
https://engineering.nifty.co.jp/blog/9817